Set up a smart home device by connecting it to power, joining it to your home Wi-Fi through its app, and testing its controls. This guide is for beginners setting up a smart light, plug, speaker, thermostat, camera, or similar device. Allow 20–45 minutes for one device; some products take longer if they need a firmware update or account setup.

Get everyday essentials delivered free with Prime
- Fast, free delivery on millions of items
- Prime Video, Amazon Music and more included
- Member-only deals all year
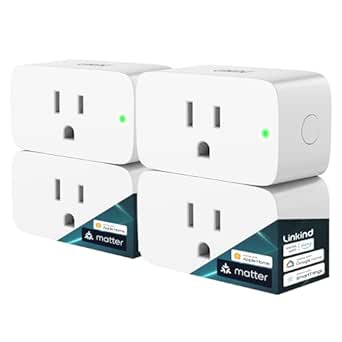
Linkind Matter Smart Plug, 4-Pack
- ✔ Pack size: 4 plugs
- ✔ Connectivity: Matter; 2.4 GHz Wi-Fi; IPv6
- ✔ Platforms: Apple Home, Alexa, Google Home, SmartThings, AiDot app

Kasa Smart Wi-Fi Plug HS103P4, 4-Pack
- ✔ Pack size: 4 plugs
- ✔ Model: HS103P4
- ✔ Connectivity: 2.4 GHz Wi-Fi

Amazon Echo Show 5 Smart Display with Alexa, Charcoal
- ✔ Display: 5.5-inch touchscreen
- ✔ Camera: 2 MP with built-in shutter
- ✔ Speaker: 1.75-inch full-range speaker
Difficulty: Beginner | Time: 20–45 minutes per device
What You’ll Need
Tools & Materials:
- Smart home device and its power adapter, batteries, or mounting parts
- Phone or tablet with the manufacturer’s app installed
- Home Wi-Fi name and password
- A nearby electrical outlet, if the device needs power
Knowledge:
- Basic ability to install an app and connect a phone to Wi-Fi
- Access to the household Wi-Fi network and permission to use the router
Check the product label or manual for supported Wi-Fi bands, hubs, and phone requirements. Many devices require a 2.4 GHz Wi-Fi network; some newer models also support 5 GHz or use a separate hub. Keep the device near the router during setup, and use the manufacturer’s official app.
Linkind Matter Smart Plug, 4-Pack
For a household building around more than one smart home platform, Matter compatibility makes the Linkind four-pack the most adaptable choice in this lineup. It works with Apple Home, Alexa, Google Home, SmartThings, and the AiDot app, giving us more room to choose or change how compatible plugs are controlled. By comparison, the Kasa pack is limited to Alexa and Google Assistant, while the Echo Show 5 is an Alexa-centered screen rather than a multi-platform outlet solution.Schedules, timers, remote access, and voice control cover the everyday jobs we expect from a smart plug: turning lamps on at set times, controlling a fan from another room, or switching an appliance off by voice. Local network control can also help keep control available when the internet is down, provided the local setup supports it. The compact form and stated short-circuit and overload protection are practical advantages for outlets used around the home.The flexibility comes with more setup conditions than Kasa. The plug requires 2.4 GHz Wi-Fi and IPv6, and Apple Home, Alexa, Google Home, and SmartThings require a Matter-certified hub or controller. Buyers who want to avoid adding or configuring a controller may find Kasa easier. We should also check outlet spacing and the needs of the appliance before using any plug, especially near its stated 15 A and 1800 W limits.
Pros:
- Matter support spans Apple Home, Alexa, Google Home, SmartThings, and AiDot.
- Four plugs include remote access, voice control, schedules, and timers.
- Local network control is supported when internet access is unavailable.
- Compact design includes short-circuit and overload protection.
Cons:
- Major platform integrations require a Matter-certified hub or controller.
- Requires 2.4 GHz Wi-Fi and IPv6.
- Broad compatibility still depends on the specific controller and home setup.
Best for: Households that use, or expect to use, multiple Matter-compatible smart home platforms and want four outlets with scheduling and remote control.
Not ideal for: Buyers without a 2.4 GHz network, IPv6, or a compatible Matter controller for their preferred platform, and anyone seeking the fewest setup steps.
Bottom line: We recommend Linkind for buyers who value cross-platform flexibility and can accommodate its controller and network requirements.
“We recommend Linkind for buyers who value cross-platform flexibility and can accommodate its controller and network requirements.”
Kasa Smart Wi-Fi Plug HS103P4, 4-Pack
The Kasa HS103P4 is the direct choice for buyers who want a set of smart outlets and already use Amazon Alexa or Google Assistant. Its main advantage over Linkind is a simpler stated setup: Kasa connects over 2.4 GHz Wi-Fi and works without a separate hub. That makes it a practical entry point for controlling lamps, fans, and other compatible appliances through voice commands or the Kasa app.Schedules and timers cover much of what makes a plug useful after setup. We can set a lamp to switch on at a routine time or turn a fan off automatically, without needing a display like the Echo Show 5. The four-pack also makes it easier to extend basic control to several outlets at once. Kasa’s UL certification and stated two-year warranty offer useful purchase details, though they do not change its narrower platform reach.The tradeoff is that it does not list Matter support and supports fewer voice ecosystems than Linkind. Buyers committed to Apple Home or SmartThings should look elsewhere in this comparison, and households that may switch platforms later have less stated flexibility. Setup also depends on a compatible Android or iOS device and the Kasa app. Like the Linkind plugs, it needs 2.4 GHz Wi-Fi; unlike Linkind, it does not list local network control when internet access is unavailable.
Pros:
- Works with Alexa and Google Assistant without a separate hub.
- App control includes remote operation, schedules, and timers.
- Four-plug pack can cover multiple lamps or small appliances.
- UL certified, with a stated two-year warranty.
Cons:
- Limited to Alexa and Google Assistant in the supplied compatibility details.
- Requires 2.4 GHz Wi-Fi and the Kasa app on a compatible mobile device.
- Does not list Matter support or local network control during internet outages.
Best for: Alexa or Google Assistant households that want four app-controlled plugs, schedules, and timers without buying a hub.
Not ideal for: People who need Apple Home, SmartThings, Matter compatibility, or a stated local-control option during internet outages.
Bottom line: Choose Kasa when simple hub-free control for Alexa or Google homes matters more than broad platform support.
“Choose Kasa when simple hub-free control for Alexa or Google homes matters more than broad platform support.”
Amazon Echo Show 5 Smart Display with Alexa, Charcoal
The Echo Show 5 serves a different role from the two plug packs: it gives us a small touchscreen for Alexa and compatible smart home devices. Its 5.5-inch display can show content, support video calls, and provide a visual way to control devices. That makes it a better fit for a kitchen counter or bedside table than either outlet pack when seeing information and tapping controls matters. The Linkind and Kasa plugs, in contrast, are the stronger picks when the main goal is switching several appliances on a schedule.A built-in camera supports video calls and viewing compatible cameras, while the camera shutter and microphone/camera off button provide physical privacy controls. The 1.75-inch speaker and dual-band Wi-Fi add to its role as a compact home display. Recycled fabric yarn and aluminum, along with recyclable packaging, are also specified in its materials details.Its place in a smart home depends on Alexa and the services and devices we want to use. Some skills and services may require subscriptions or other fees, and the supplied details do not describe broad cross-platform control comparable to Linkind’s Matter support. The camera may not suit buyers who prefer not to keep a video-call device in shared spaces, even with its privacy controls. Choose this over the plug packs when screen-based interaction is central; skip it if we only need scheduled outlet control or want a more platform-neutral setup.
Pros:
- 5.5-inch touchscreen provides a visible control point for compatible devices.
- Built-in camera supports video calls and viewing compatible cameras.
- Camera shutter and microphone/camera off button provide privacy controls.
- Uses recycled fabric yarn and aluminum, with recyclable packaging.
Cons:
- Alexa and compatible services shape its smart home usefulness.
- Some skills and services may require subscriptions or other fees.
- Not an outlet pack; buyers still need compatible smart plugs for scheduled appliance control.
Best for: Alexa households that want a compact touchscreen for compatible smart home controls, video calls, and camera viewing.
Not ideal for: Buyers looking only for smart outlets, those prioritizing Matter-based platform flexibility, or anyone uncomfortable placing a camera-enabled display at home.
Bottom line: Pick the Echo Show 5 when a compact Alexa screen and camera are more useful to us than adding controlled outlets.
“Pick the Echo Show 5 when a compact Alexa screen and camera are more useful to us than adding controlled outlets.”
As an Amazon Associate we earn from qualifying purchases.
Before You Start
Choose a strong Wi-Fi password and make sure your phone is connected to the home network. If your router combines 2.4 GHz and 5 GHz under one network name, try setup as instructed by the device maker; do not change router settings unless the instructions call for it. For cameras, locks, thermostats, or other devices that affect security, entry, or essential systems, follow the installation and placement instructions carefully. Do not wire a device or alter electrical equipment unless you are qualified to do so.
Step-by-Step Instructions
Step 1: Check compatibility and placement
Read the device’s setup guide or product page and confirm that it supports your Wi-Fi network, phone, and any smart home hub or voice assistant you plan to use. Choose a location with reliable Wi-Fi and access to the required power source. For a camera or sensor, pick a spot that fits its purpose and follows the maker’s mounting and privacy instructions.
Tip: If the device requires a hub, identify the hub and set it up before pairing the device.
Check: You know where the device will go and have confirmed that the network and any required hub are supported.
Step 2: Install the official app and sign in
Install the app named in the device manual from your phone’s official app store. Open it, create an account or sign in, and grant only the phone permissions needed for setup, such as Bluetooth or local network access. Turn on Bluetooth if the app requests it.
Tip: Check the app publisher before installing it, and avoid setup links from unfamiliar messages or websites.
Check: The app opens to its setup screen, and you can sign in or create an account.
Step 3: Power on the device
Connect the device to power or install its batteries as directed. Wait for its status light, tone, or display to indicate that it is ready. If the device was previously used, follow the manual’s reset instructions to return it to pairing mode.
Tip: A reset may erase saved settings. Reset only when needed, and follow the model-specific instructions instead of guessing at button combinations.
Check: The device shows the pairing signal described in its manual or app.
Step 4: Add the device in the app
In the app, choose the option to add or set up a device. Select the correct product type or scan its setup code when prompted. Keep your phone close to the device and follow the on-screen directions to pair them, often over Bluetooth or a temporary device network.
Tip: Allow the app to use the requested permissions during pairing; denying local network or Bluetooth access can prevent discovery.
Check: The app identifies the device and advances to network setup or a confirmation screen.
Step 5: Connect it to Wi-Fi
Select your home Wi-Fi network in the app and enter its password exactly as it is written. If the app asks you to choose a band, use one the device supports. Wait for the connection to complete without closing the app or unplugging the device.
Tip: Passwords are case-sensitive. If the network name does not appear, move closer to the router and confirm that the device supports that band.
Check: The app reports that the device is online, or the device shows its connected status.
Step 6: Name and organize the device
Give the device a short, recognizable name, such as “Living Room Lamp,” and assign it to the correct room if the app offers that option. Use a name that is easy to distinguish from other devices, especially if you will use voice commands.
Tip: Avoid near-duplicate names such as “Desk Light” and “Desk Lamp” if you plan to control them by voice.
Check: The device appears in the intended room with a name you can recognize.
Step 7: Review security and privacy settings
Open the device settings and review available security, privacy, and sharing controls. Use a unique account password, enable two-factor authentication if offered, and limit household or guest access to people who need it. For cameras and microphones, review recording, notification, and privacy-zone options.
Tip: Place cameras to capture only the areas you intend to monitor, and follow local rules and household expectations about recording.
Check: You know which accounts can access the device and have set the privacy options that suit its location and purpose.
Step 8: Update and test the device
Install any firmware update offered by the app, keeping the device powered and connected while it runs. Then test its main function in the app: switch the light or plug on and off, play a short command on a speaker, or check a camera’s live view. Test physical controls too when available.
Tip: Updates can take several minutes. Do not disconnect power during an update unless the manufacturer instructs you to.
Check: The device responds to its main control, and the app shows the expected status.
Step 9: Add optional routines or voice control
After basic control works, link a compatible voice assistant or create a simple routine in the relevant app. Choose a clear command or trigger, select the device action, and save it. Test the routine while you are present so you can correct an unintended action.
Tip: For locks, heaters, and other high-impact devices, avoid routines that could operate unexpectedly when nobody is available to respond.
Check: The assistant lists the device or the routine runs once as expected.
Common Mistakes to Avoid
- Entering the wrong Wi-Fi password or selecting an unsupported network band. — Check the password carefully and confirm the device’s supported Wi-Fi bands in its manual before retrying.
- Starting setup with the device too far from the router. — Pair it near the router first, then move it to its intended location and check its connection there.
- Using an unofficial app or granting broad account access unnecessarily. — Install the app named by the manufacturer and review account sharing and phone permissions.
- Creating a routine before confirming the device works on its own. — Test basic app control first, then add routines or voice control one at a time.
Troubleshooting
Problem: The app cannot find the device.
Solution: Move the phone closer, turn on Bluetooth if required, and confirm that the device is in pairing mode. Restart the app and follow the model’s reset directions if it was previously paired.
Problem: The Wi-Fi connection fails.
Solution: Re-enter the password, check the supported network band, and try setup near the router. If the router uses separate network names, select the compatible one; consult the manufacturer’s instructions before changing router settings.
Problem: The device appears offline after setup.
Solution: Check its power and Wi-Fi signal at its installed location. Restart the device and router if practical, then reopen the app. Reposition the device or improve coverage if the connection remains weak.
Problem: The device connects but does not respond to commands.
Solution: Confirm that the device is online in its app, install pending updates, and test its direct app control. If only voice control fails, check that the correct assistant account is linked and that the device name is distinct.
What Success Looks Like
The device appears under the correct name and room in its app, shows an online or connected status, and responds to its main control. Any optional routine or voice command you configured also works during a test. You know which accounts can access it and have reviewed the relevant privacy settings.
Next Steps
Keep the app and device firmware updated, and check the device’s connection after moving it or changing your Wi-Fi setup. Review shared access periodically, especially when household members change. Add other devices one at a time, testing each before building routines that control several devices.
Frequently Asked Questions
Do all smart home devices need a hub?
No. Many connect directly to Wi-Fi or Bluetooth, while some use a dedicated hub for setup or communication. Check the device specifications before buying or pairing it.
Why does my device only work with 2.4 GHz Wi-Fi?
Some devices use 2.4 GHz because it can reach farther through walls and is supported by their network hardware. Follow the product instructions and select a supported band during setup.
Can I set up a device without an internet connection?
Usually, initial setup requires internet access for the app, account, or firmware. Some devices offer limited local control afterward, but features vary by product.
Is it safe to use smart devices with voice assistants?
Review the assistant’s account, voice history, and device access settings. Use a strong account password, enable two-factor authentication where available, and avoid linking devices or services you do not use.